When I needed reverb on 5 different channels in my DAW, I used to drop a reverb unit on each one and call it a day. Turns out I was doing it all wrong…
It ate up my computer’s CPU. It was so inefficient. And all my reverbs ended up sounding different.
Then I discovered sends and returns. My life changed completely – or at least my mixes did! (but mixing is life right?!)
You might be wondering: what are sends and returns? How do I use them? Why should I care?
Well, here’s everything you need to know about Sends and Returns – and how to use them to get a better, more cohesive mix.
What are sends and returns?
Sends and Returns let you run multiple sounds through the same effect in your mix.
No more putting a reverb on every different channel and trying to duplicate the settings knob-by-knob.
Each Return channel in your DAW allows you to set up an effect on a separate channel. The Send knobs let you apply that effect on as many channels as you want.
Parallel compression uses the same principle.
Using Sends and Returns is great for making your signal flow more efficiently. It saves a lot of CPU usage (the juice your computer needs to run without glitching).
And it glues your mix together. Because the luxury of sending your sounds through the same effect makes your whole mix more cohesive.
Ready to try it? Let me show you how!
Best way to use Sends and Returns in your DAW
Let’s say you have a vocal track, a synth track and a bassline track – and you want the same reverb on all three.
Here’s how to do it using Sends and Returns in Ableton Live (the same idea applies to all DAWs):
1. Find the reverb Return track. It’s near the Master track. It’s called ‘A Reverb’.
2. Set your Return track Reverb to 100% wet.
3. Use the corresponding Send knob (so ‘A’) to put reverb on each track.
Use this knob as a wet/dry knob. The advantage: it lets you apply different amounts of reverb on each track.
4. Create as many additional Return tracks as you want. Just right click and select ‘Insert Return Track’ when you’re in session view. Drag any effect on it.
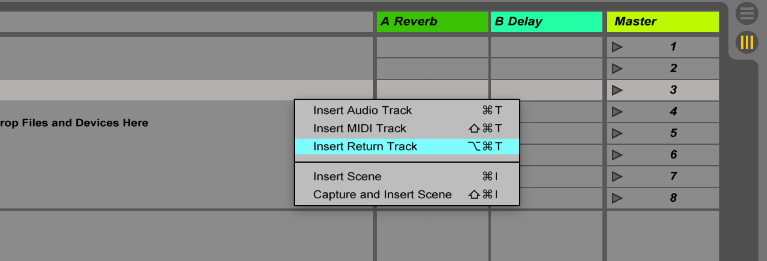
*Note: if you don’t see your Returns and Sends, they might be off. To turn them on click the S and R buttons near the bottom right corner:
Experiment!
Add as many Return tracks as you want with different effects. Reverb and Delay are the most common but try different ones like chorus, flanger or distortion.
Experiment with adding more than one effect on the same Return track.
Try even dropping the Ableton ‘Audio Effects Rack’ on a Return track and creating a custom chain of effects:

The sky’s the limit in terms of what you can do with Return tracks.
Bust out the Buses
Since we’re on the subject of smart signal flows, here’s another hot tip to make your workflow efficient.
The word ‘bus’ comes up a lot in mixing. A bus is a channel through which you send several signals.
For example: if you’re layering drums you probably have three channels with drums on them. So you’ll want to put them all on one bus.
How do you do that? It’s super easy. Group your tracks!
In Ableton Live (it can be done in most DAWs):
- Hold the Shift key while clicking on all the tracks you wanna group.
- Right click and select ‘Group Tracks.’
- Another track will appear on the side. This is your bus – it’ll allow you to control all the drum tracks with one fader.
Sends Are Your Friends
Sends and Returns are the smart way to apply one effect to many channels in your mix. Think about it: if you were using a hardware mixing board and had only one reverb unit, how would you apply it to 15 channels?
You’re not going to buy 15 reverbs, that’s expensive, inefficient and a little crazy! You’d use Sends and Returns, that’s where the concept comes from.
The same logic applies to DAWs. So invite Sends and Returns to your mixing party!