I used to dive into my mixes way too fast. I’d have all my raw audio tracks sounding good. And I’d be itching to start processing.
An ounce of prevention is worth a pound of cure.
So I’d jump right in and start mixing willy nilly.
But as my mix progressed I’d realize that I was fighting all my levels. My master bus was clipping after every process and i’d always have to go back and lower it.
And even if I did that my mix wouldn’t have proper headroom for mastering. It was a major buzzkill.It’s not the most popular part of producing. But trust me, every single one of your mixes NEEDS it.
If you don’t do it you’re setting up major limitations for yourself.
Your best Mixing foot forward
The solution to mixing success is simple: proper gain staging.
You should monitor your levels throughout your mix. But proper gain staging starts before you apply any processing to your sounds.
Gain staging isn’t the sexiest part of mixing. But you have to cut the carrots before you make the soup. Gain staging is no different.
Why Gain Stage?
You might be thinking “gain staging only matters for analog. If i’m using a DAW software I don’t need to worry about it.”
It’s sort of true, but not really.
The noise floor that existed in analogue recording isn’t really an issue since 24-bit audio become the norm.
But here’s the kicker: most VSTs are modelled after analog gear! Which means they need proper headroom to work.
The level of the signal that you put in matters. Even in your DAW.
If your signal is too hot going into a VST that models analog processing, it causes fatiguing distortion and saturation.
Save yourself time and skip the frustration
Proper gain staging also gives you ample headroom to work with during your mixing.
Having to go back and fix volume faders every time you apply a process is a great way to get super frustrated.
So now that you know the ‘why’ of gain staging let’s get into the ‘how.’
Here’s everything you need to know to set your mix up for success.
1. Listen to all your tracks together
This might seem obvious, but listen to all your audio tracks together. Keep your master bus visible to be sure you’re not clipping.
A common mistake is to keep your master bus as close to the red as you can without going over.
Hot tip: if your mix is too quiet don’t turn up the master bus. Just turn-up your monitors or headphones instead.
Keeping your levels reasonable before you start mixing will give you ample headroom to work with later on when you’re applying effects and using VSTs.
A good rule of thumb is to keep each audio track at around -18dBFS with the loudest part of your mix (like a snare for example) peaking at around -10dBFS.
If your master bus is clipping right away (way in the red) it means that your raw mix needs some attention before you start processing.
2. Attenuate (turn down) the problem
To get within that nice -10dBFS to -18dBFS window, you’re going to need to adjust the volume faders on some of your audio tracks.
Knowing which one to turn down is as simple as monitoring the specific track levels and seeing which one needs work.
Sometimes ALL your tracks need to be turned down to find a good consistent amount of headroom. So don’t be afraid to be extra conservative.
Hot tip: Your waveform may look small at this point. Resist the urge to turn things up. If you wanna see it bigger for editing, just zoom in.
Attenuate until your master bus is giving you that -10dBFS to -18dBFS sweet spot we talked about earlier.
3. The roughest of mixes
Mix your raw audio as far as you can without processing. That means finding the best balance possible without pushing your levels.
Keep an idea of how you want your final mix to sound while you’re still in the gain staging phase.
If you want a certain drum track to be the loudest part later on in your mix, attenuate everything else with that drum track as your loudness benchmark.
Experiment with panning during this phase as well and find a good place for everything before you process.
Keeping the balance
If you’ve balanced all your audio tracks to a place that you’re happy with but your master bus is still clipping don’t worry.
Most DAWs have a track grouping function. Use it to attenuate groups of tracks that all need to come down.
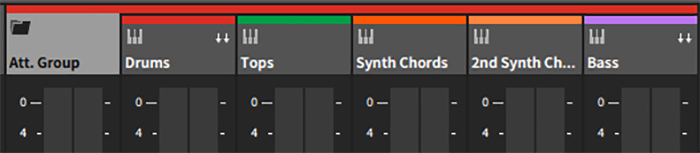
This will ensure that you’re not compromising the balance you created while you were making your rough mix.
After you attenuate to your taste, ungroup the tracks and listen again to be sure that everything is still in the right place.
Up-staging your last mix
The bottom line of gain staging is leaving room to work in.
If your mix is gain staged properly from the start you’ll have a much easier time applying effects, VSTs and other processes that are frustrating to use when there’s no headroom.
Gain stage your next mix and stop fighting the reds the whole time. Your overall signal will sound cleaner and more focussed than previous mixes.
Plus your final master will sound better. If your mix is staged well there will be more room for mastering to do its thing.
So add gain-staging to your workflow for happier mixing. And save all that hair you were pulling out before.